For a personal project, I was looking for some guidance on how to develop a simple browser extension, but the information on this topic was so fragmanted and difficult to grasp. I then came accross a book named Building Browser Extensions which is focused on the same topic and I found it useful for getting an overall understanding of how to develop a simple extension, but it’s quite long, so I started summarizing the important parts for myself. What follows is just my notes and summaries from this book.
Fundamentals
Manifest
The manifest is the rulebook for the browser extension. Every extension is required to provide this manifest as JSON data in a manifest.json file. Some examples of what is contained in the manifest:
- Public information such as the extension name, description, semantic version, icons, and author.
- Pointers to entrypoint files for background scripts, popup pages, options pages, devtools pages, and content scripts.
- Requirements and configurations the extension needs to properly operate, such as permissions, content security policies, cross-origin policies, and minimum browser versions.
- Pattern-match rule sets for managing network requests, enabled domains, and resources the extension wishes to inject into the page via content script.
- Miscellaneous extension-specific options like enabling offline and incognito and keyboard shortcuts.
A sample manifest.josn:
{
  "name": "Extension Name",
  "description": "Browser extension created from scratch",
  "version": "1.0",
  "manifest_version": 3,
  "icons": {
    "16": "images/icon-16.png",
    "32": "images/icon-32.png",
    "48": "images/icon-48.png",
    "128": "images/icon-128.png"
  },
  "background": {
    "service_worker": "scripts/background.js"
  },
  "action": {
    "default_popup": "popup/index.html"
  },
  "options_page": "options/options.html",
  "content_scripts": [
    {
      "js": ["scripts/content.js"],
      "matches": ["*://example.com/*"],
      "run_at": "document_end"
    }
  ],
  "permissions": ["activeTab", "scripting"]
}
Background scripts
The primary purpose of background scripts is to handle browser events. These events might be extension lifecycle events such as an install or uninstall, or they might be browser events like navigating to a web page or adding a new bookmark.
They can access the WebExtensions APIs and therefore are capable of performing actions such as exchanging messages with other parts of the extension, exchanging messages with other extensions, or programmatically injecting content scripts into a page.
To inspect the background service worker, use the service workder link in the extension page in the browser’s settings. This will open a new inspection window.
If the action parameter in the manifest.json file left empty, action will be handled by background script:
// manifest.json
"action": {},
"background": {
  "service_worker": "background.js"
}
// background.js
chrome.action.onClicked.addListener(() => {
  console.log("Clicked toolbar icon!");
});
Popup page
The popup page is a native browser container that browser extensions can use to display a custom user interface. The popup page behaves as a dialog box that “pops” over the web page when the user clicks the extension toolbar button. The popup page will always appear directly below the toolbar. Because it can be quickly accessed and can show over any web page, the popup page typically contains content that users need easy access to.
Popup pages are rendered just like regular web pages, but their dialog-like nature means they are disposable: the popup will be freshly rendered each time the popup is opened, and unloaded when the popup is closed. Like background scripts, popup pages can access the WebExtensions API, meaning they have the same set of capabilities.
The popup page cannot be opened programmatically, it must be triggered by a toolbar click or similar privileged browser action.
To open a popup page when user clicks on the extension icon in toolbar, add the following to manifest.json:
"action": {
  "default_popup": "popup/popup.html"
}
Options page
The options page is a native browser container that browser extensions can use to display a custom user interface. The options page behaves as a standalone web page that opens when the user clicks “Options” in the extension toolbar context menu.
Like the popup page, this is a fully featured web page with access to the WebExtensions API, meaning you are capable of using it as a full web application.
To add an options page in manifest.json:
"options_page": "options/options.html"
Unlike the popup, the options page can be opened programmatically, but content scripts can’t open an option page. The following actions will open the options page:
- Right clicking the toolbar icon button and selecting Options
- Calling
chrome.runtime.openOptionsPage()
Content scripts
The term content script broadly refers to any content that is injected into a web page. JavaScript can either be injected declaratively in the manifest, or programmatically from an extension page or background script via the WebExtensions API. This content can be JavaScript, CSS, or both.
Content scripts are fully capable of reading and writing the page, enabling things like in-page widgets or full integration with the web page. Content scripts have limited access to the WebExtensions API, so they are incapable of many actions that are possible in the popup page, options page, or background script. They can, however, exchanges messages with other extension elements like background scripts. Therefore, content scripts can still indirectly use the WebExtensions API by delegating actions to a background script.
Development
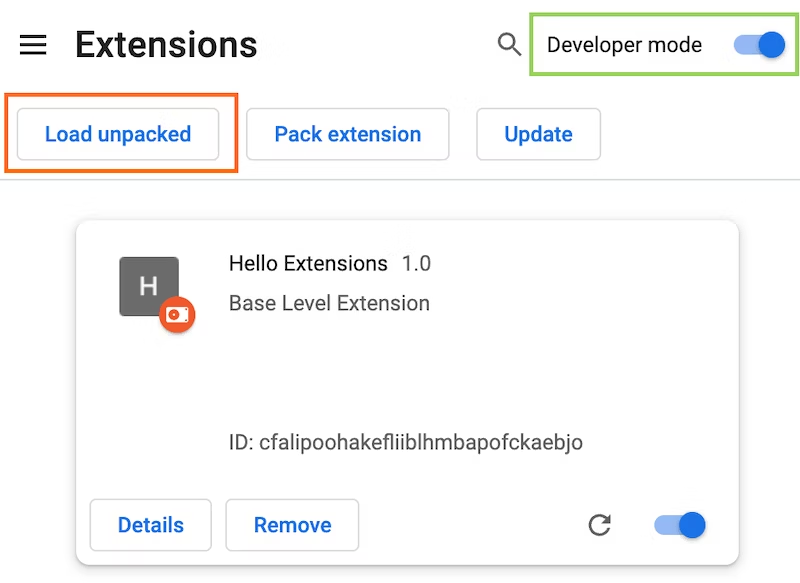
Installation and reload
To install an extension, open the extensions page in the browser and use Load unpacked option. After making changes to the extension scripts, you should hit the reload icon in the extensions page for the changes to be used.
Keyboard shortcuts
commands is used to add keyboard shortcut support in an extension:
// manifest.json
"commands": {
  "foobar": {
    "suggested_key": {
      "default": "Ctrl+Shift+J",
      "mac": "MacCtrl+Shift+J"
  },
  "description": "Perform foobar action"
  }
}
Programatic injection of content scripts
The manifest is not the only way to inject content scripts. It is also possible to programmatically inject JavaScript and CSS into the page using the chrome.scripting API.
// background.js
chrome.action.onClicked.addListener((tab) => {
  const target = {
    tabId: tab.id,
  };
  chrome.scripting.executeScript({
    target,
    func: () => {
      document.body.innerHTML = `Hello, world!`;
    },
    // or: files: ["content-script.js"],
  });
  chrome.scripting.insertCSS({
    target,
    css: `body { background-color: red !important; }`,
    // or: files: ["content-script.css"],
  });
});
WebExtensions API
Permissions
Inspect current permissions and add or remove permissions. More: chrome.permissions
Messaging
Send messages between parts of the extension, or between the extension and an outside entity. More: Chrome Extensions Message passing , chrome.runtime , chrome.tabs
Storage
A simple but powerful key/value storage. More: chrome.storage
storage.localstores values only on the local browserstorage.syncstores values that are shared between the authenticated browser sessionstorage.sessionstores values in memory that will be discarded when the browser closesstorage.managedis a read-only store intended for enterprise users
chrome.storage.onChanged.addListener(console.log);

await chrome.storage.local.set({ foo: "tmp" });
// { foo: { newValue "tmp" } }

await chrome.storage.local.set({ foo: "bar", baz: "qux" });
// {
//   foo: { oldValue: "tmp", newValue "bar" }
//   baz: { newValue "qux" }
// }

console.log(await chrome.storage.local.get(["foo", "baz"]));
// { foo: "bar", baz: "qux" }
Authentication
Manage authentication state and OAuth flows. More: chrome.identity
Network requests
More: chrome.declarativeNetRequest , chrome.webRequest , chrome.webNavigation
declarativeNetRequestis used to declaratively instruct the browser to manage page traffic according to a set of rules defined by the extension.webRequestis used to imperatively control page traffic with JavaScript handlers.webNavigationis used to inspect tab-level navigation events.
Action
Control the extension toolbar icon, including appearance, title text, badge content, badge color, popup page, and click handlers. More: chrome.action
Notifications
Display rich notifications to the user using the host operating system’s notification mechanism. More: chrome.notifications
Context menu
Add interactive options to right click and context menus throughout the browser. More: chrome.contextMenus
Authentication
Content script spoofing
Network requests from a content script are treated the same as network requests from a host page script. Therefore, if a website uses HttpOnly cookie authentication, a content script will be able to piggyback on that authenticated state and send requests that will automatically include those cookies.
Cookie authentication
Technically possible, but not recommended.
JWT authentication
The ideal scenario in browser extensions. Popups, options pages, and background scripts can all directly authenticate with a server and share the authentication token between extension components without issue.
OAuth and OpenID
With the chrome.identity API, browser extensions have first-class support for OAuth and OpenID.
There are two ways of using OAuth in an extension:
chrome.identity.getAuthToken()allows you to natively authenticate. This method allows you to skip providing a redirect URL and making the authorization token request. Instead, you simply provide the required values inside the OAuth2 manifest property and call this method. The browser will kick open the OAuth dialog and the method’s callback will be passed the OAuth token. This is by far the simplest way of implementing OAuth in an extension, but it is only available inside Google Chrome. This requires a “Chrome app” client ID.chrome.identity.launchWebAuthFlow()is the more generalized method for using OAuth2. It is cross-browser (works on Firefox, Edge, etc.) and cross-platform (supports OAuth2 with Facebook, Github, etc.). It is much more labor intensive, as it requires you to manually implement each of the OAuth2 steps.
To solve the OAuth redirect URL problem, the browser supports a special URL (accessible with chrome.identity.getRedirectURL() method) that will direct the auth flow back to the extension.